Hi All, Here is the logic to format Phone Number field into '(xxx) xxx-xxxx' format. It only allows user to enter only numeric characters, up to 10 char's.
function Bindevents() {
// Binding the events to crm field, which needs to be validated
crmForm.all.telephone1.onkeypress = isvalidPhone;
crmForm.all.telephone1.onblur = function () { formatPhoneNumber("telephone1"); };
}
// Allows to enter only Numbers & upto 10 char's
function isvalidPhone() {
var charCode = event.keyCode;
if (charCode > 31 && (charCode < 48 || charCode > 57))
return false;
var phnum = event.srcElement.value.replace(/[^0-9]/g, "");
if (phnum.length >= 10)
return false;
return true;
}
// Formats Phone Number to '(xxx) xxx-xxxx' format
function formatPhoneNumber(phnum) {
var phone = Xrm.Page.getAttribute(phnum).getValue();
var tmp = phone.replace(/[^0-9]/g, "");
phoneRegex = /^\d{10}$/;
if (!tmp.match(phoneRegex)) {
event.returnValue = false;
Xrm.Page.data.entity.attributes.get(phnum).controls.get(0).setFocus();
}
else {
var formtedphn = "(" + tmp.substr(0, 3) + ") " + tmp.substr(3, 3) + "-" + tmp.substr(6, 4);
Xrm.Page.getAttribute(phnum).setValue(formtedphn);
}
}
Hope it helps!!!!
Wednesday, November 30, 2011
Monday, November 28, 2011
How to Debug CRM 2011 online plugin
Hi All, its difficult to debug plugins registered in sandbox on CRM 2011 online version. Follow the Steps to debug plugins registered for online version
- Install Plugin Pro-filer in the plugin registration Tool.(if you don’t find this option, download latest SDK)

- Now Register the plug-in and step on the Microsoft Dynamics CRM server. Keep a copy of the debug compiled plug-in assembly on the computer where you are running the tool(@SDK\sdk\tools\pluginregistration\bin\Debug)
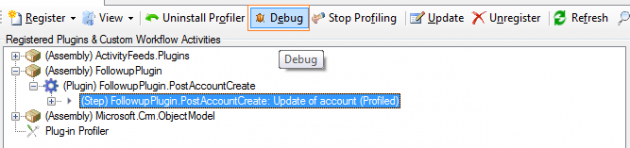
- Select a plug-in step and click Profile to enable profiling.

- Perform the operation in Microsoft Dynamics CRM that causes the plug-in to run. Ex: Here updation of Account which trigger the plugin.

- Now the plug-in throws an exception and the Business Process Error dialog is displayed, click Download Log File and save this file.

- In the Plug-in Registration tool, click Debug.
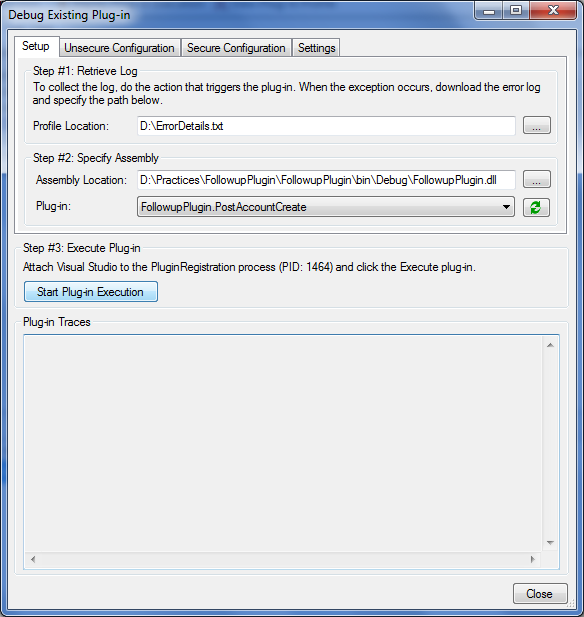
- Debug Dialog will open
- Now open the plugin solution in Visual Studio and then place the break point to debug, attach the debugger to PluginRegistration.exe process.

- Click Start Plug-in Execution in the Debug Existing Plug-in dialog box

- Now the debugger will start debugging from the break point in the VS. Now you can debug the plugin in the normal way like on-premise.

- For more info on plugin debugging click . I hope it helps!!!!!!
Wednesday, November 23, 2011
Adding New Group to CRM Form in CRM 2011
Hi Friends, Now I will walk through how to add a new group to an OOB entity.


<RibbonDiffXml>
<CustomActions>
<CustomAction Id="Sample.account.form.CustomGroup.CustomAction" Location="Mscrm.Form.account.MainTab.Groups._children" Sequence="110">
<CommandUIDefinition>
<Group Id="sample.account.form.CustomGroup.Group" Command="sample.account.form.CustomGroup.Command" Title="$LocLabels:sample.account.CustomGroup.Title" Sequence="38" Template="Mscrm.Templates.Flexible2" Image32by32Popup="$webresource:new_samplebutton32x32.png">
<Controls Id="sample.account.form.CustomGroup.Controls">
<Button Id="sample.account.form.CustomGroup.Button.A" Command="sample.account.CustomGroup.Button.A.Command" Sequence="20" LabelText="$LocLabels:sample.account.CustomGroup.Button.A.LabelText" ToolTipTitle="$LocLabels:sample.account.CustomGroup.Button.A.LabelText" ToolTipDescription="$LocLabels:sample.account.CustomGroup.Button.A.Description" TemplateAlias="o1" Image16by16="$webresource:new_samplebutton16x16.png" Image32by32="$webresource:new_samplebutton32x32.png" />
</Controls>
</Group>
</CommandUIDefinition>
</CustomAction>
<CustomAction Id="sample.account.form.CustomGroup.MaxSize.CustomAction" Location="Mscrm.Form.account.MainTab.Scaling._children" Sequence="120">
<CommandUIDefinition>
<MaxSize Id="sample.account.form.CustomGroup.MaxSize" GroupId="sample.account.form.CustomGroup.Group" Sequence="21" Size="LargeLarge" />
</CommandUIDefinition>
</CustomAction>
</CustomActions>
<Templates>
<RibbonTemplates Id="Mscrm.Templates"></RibbonTemplates>
</Templates>
<CommandDefinitions>
<CommandDefinition Id="sample.account.CustomGroup.Button.A.Command">
<EnableRules/>
<DisplayRules>
<DisplayRule Id="sample.account.form.DisplayRule.NotonCreate" />
</DisplayRules>
<Actions>
<JavaScriptFunction Library="$webresource:new_sample.js" FunctionName="TestFunction"></JavaScriptFunction>
</Actions>
</CommandDefinition>
<CommandDefinition Id="sample.account.form.CustomGroup.Command">
<EnableRules/>
<DisplayRules>
<DisplayRule Id="sample.account.form.DisplayRule.NotonCreate" />
</DisplayRules>
<Actions />
</CommandDefinition>
</CommandDefinitions>
<RuleDefinitions>
<TabDisplayRules />
<DisplayRules>
<DisplayRule Id="sample.account.form.DisplayRule.NotonCreate">
<FormStateRule State="Create" InvertResult="true" />
</DisplayRule>
</DisplayRules>
<EnableRules />
</RuleDefinitions>
<LocLabels>
<LocLabel Id="sample.account.CustomGroup.Button.A.Description">
<Titles>
<Title languagecode="1033" description="Custom Button Description" />
</Titles>
</LocLabel>
<LocLabel Id="sample.account.CustomGroup.Button.A.LabelText">
<Titles>
<Title languagecode="1033" description="Custom Button" />
</Titles>
</LocLabel>
<LocLabel Id="sample.account.CustomGroup.Title">
<Titles>
<Title languagecode="1033" description="Custom Group" />
</Titles>
</LocLabel>
</LocLabels>
</RibbonDiffXml>
5. Now zip the solution and import back to CRM. you will find the custom Group on the Account Form.
Hope it helps!!!
Before Adding Custom Group to Account Entity
After Adding Custom Group to Account Enity
Follow the following steps
1. Export the solution to which we wants to customize
2. Open the Customizations.xml file in edit mode
3. Find "RibbonDiffXml" tag under Account entity
4. customize the "RibbonDiffXml" in the following way to add custom group to Entity Form
<CustomActions>
<CustomAction Id="Sample.account.form.CustomGroup.CustomAction" Location="Mscrm.Form.account.MainTab.Groups._children" Sequence="110">
<CommandUIDefinition>
<Group Id="sample.account.form.CustomGroup.Group" Command="sample.account.form.CustomGroup.Command" Title="$LocLabels:sample.account.CustomGroup.Title" Sequence="38" Template="Mscrm.Templates.Flexible2" Image32by32Popup="$webresource:new_samplebutton32x32.png">
<Controls Id="sample.account.form.CustomGroup.Controls">
<Button Id="sample.account.form.CustomGroup.Button.A" Command="sample.account.CustomGroup.Button.A.Command" Sequence="20" LabelText="$LocLabels:sample.account.CustomGroup.Button.A.LabelText" ToolTipTitle="$LocLabels:sample.account.CustomGroup.Button.A.LabelText" ToolTipDescription="$LocLabels:sample.account.CustomGroup.Button.A.Description" TemplateAlias="o1" Image16by16="$webresource:new_samplebutton16x16.png" Image32by32="$webresource:new_samplebutton32x32.png" />
</Controls>
</Group>
</CommandUIDefinition>
</CustomAction>
<CustomAction Id="sample.account.form.CustomGroup.MaxSize.CustomAction" Location="Mscrm.Form.account.MainTab.Scaling._children" Sequence="120">
<CommandUIDefinition>
<MaxSize Id="sample.account.form.CustomGroup.MaxSize" GroupId="sample.account.form.CustomGroup.Group" Sequence="21" Size="LargeLarge" />
</CommandUIDefinition>
</CustomAction>
</CustomActions>
<Templates>
<RibbonTemplates Id="Mscrm.Templates"></RibbonTemplates>
</Templates>
<CommandDefinitions>
<CommandDefinition Id="sample.account.CustomGroup.Button.A.Command">
<EnableRules/>
<DisplayRules>
<DisplayRule Id="sample.account.form.DisplayRule.NotonCreate" />
</DisplayRules>
<Actions>
<JavaScriptFunction Library="$webresource:new_sample.js" FunctionName="TestFunction"></JavaScriptFunction>
</Actions>
</CommandDefinition>
<CommandDefinition Id="sample.account.form.CustomGroup.Command">
<EnableRules/>
<DisplayRules>
<DisplayRule Id="sample.account.form.DisplayRule.NotonCreate" />
</DisplayRules>
<Actions />
</CommandDefinition>
</CommandDefinitions>
<RuleDefinitions>
<TabDisplayRules />
<DisplayRules>
<DisplayRule Id="sample.account.form.DisplayRule.NotonCreate">
<FormStateRule State="Create" InvertResult="true" />
</DisplayRule>
</DisplayRules>
<EnableRules />
</RuleDefinitions>
<LocLabels>
<LocLabel Id="sample.account.CustomGroup.Button.A.Description">
<Titles>
<Title languagecode="1033" description="Custom Button Description" />
</Titles>
</LocLabel>
<LocLabel Id="sample.account.CustomGroup.Button.A.LabelText">
<Titles>
<Title languagecode="1033" description="Custom Button" />
</Titles>
</LocLabel>
<LocLabel Id="sample.account.CustomGroup.Title">
<Titles>
<Title languagecode="1033" description="Custom Group" />
</Titles>
</LocLabel>
</LocLabels>
</RibbonDiffXml>
5. Now zip the solution and import back to CRM. you will find the custom Group on the Account Form.
Hope it helps!!!
Subscribe to:
Posts (Atom)