Thursday, December 22, 2011

Display Custom Advance Find view in Iframe in CRM 2011

Hi All, To bind FetchXml to Iframe Adi Katz,MVP has provided nice article to do in CRM4.0. Thanks Adi Katz for the great article. I just started converting it to work with CRM 2011. Here is the working copy of mine, to bind FetchXml to Iframe.


function loadIFrame() {

    window.fetchActivtities = new FetchViewer("IFRAME_TEST");
    fetchActivtities.FetchXml = getFetchXml();
    fetchActivtities.LayoutXml = getLayoutXml();
    fetchActivtities.Entity = "activitypointer";
    fetchActivtities.QueryId = "{00000000-0000-0000-00aa-000010001899}"; // view GUID
    fetchActivtities.RegisterOnTab(2); //IFRAME TAB INDEX


}


function getFetchXml() {

//  FetchXML Query
    return ' <fetch version="1.0" output-format="xml-platform" mapping="logical" distinct="true">' +
                '<entity name="activitypointer">' +
                 ' <attribute name="subject" />' +
                 ' <attribute name="scheduledstart" />' +
                 ' <attribute name="regardingobjectid" />' +
                 ' <attribute name="prioritycode" />' +
                 ' <attribute name="scheduledend" />' +
                 ' <attribute name="activitytypecode" />' +
                 ' <attribute name="instancetypecode" />' +
                 ' <order attribute="scheduledend" descending="false" />' +
                '<filter type="and">'+
                  '<condition attribute="regardingobjectid" operator="in">'+
                    '<value  uitype="account">{7CC58DF6-3114-E111-8E22-1CC1DEEAE7D7}</value>'+                  
                 ' </condition>'+
                '</filter>'+
                '  <attribute name="activityid" />' +
               ' </entity>' +
             ' </fetch>';

}

function getLayoutXml() {

// grid layout, you can get easily from Customization.xml file
    return '<grid name="resultset" object="4200" jump="subject" select="1" icon="1" preview="1">' +
               ' <row name="result" id="activityid" multiobjectidfield="activitytypecode">' +
               '   <cell name="instancetypecode" width="100" ishidden="1" />' +
               ' </row>' +
             ' </grid>';

}

function FetchViewer(iframeId) {
    var Instance = this;
    var vDynamicForm;
    var m_iframeTab;
    var m_iframeDoc;

    Instance.Entity = "";
    Instance.Iframe = null;
    Instance.FetchXml = "";
    Instance.QueryId = "";
    Instance.LayoutXml = "";

    Instance.RegisterOnTab = function (tabIndex) {
        Instance.Iframe = document.getElementById(iframeId);

        if (!Instance.Iframe)
            return alert("Iframe " + iframeId + " is undefined");

        m_iframeDoc = getIframeDocument();
        var loadingGifHTML = "<table height='100%' width='100%' style='cursor:wait'>";
        loadingGifHTML += "<tr>";
        loadingGifHTML += "<td valign='middle' align='center'>";
        loadingGifHTML += "<img alt='' src='/_imgs/AdvFind/progress.gif'/>";
        loadingGifHTML += "<div/><b>Loading View...</b>";
        loadingGifHTML += "</td></tr></table>";
        m_iframeDoc.body.innerHTML = loadingGifHTML;

        Instance.Refresh();

    }

    function RefreshOnReadyStateChange() {

        if (Instance.Iframe.readyState != 'complete')
            return;

        Instance.Refresh();
    }

    Instance.Refresh = function () {
   
        if (!Instance.Iframe)
            return alert("Iframe " + iframeId + " is undefined");

        m_iframeDoc = getIframeDocument();

        Instance.Iframe.detachEvent("onreadystatechange", RefreshOnReadyStateChange);

        var create = m_iframeDoc.createElement;
        var append1 = m_iframeDoc.appendChild;
        vDynamicForm = create("<FORM name='vDynamicForm' method='post'>");

        var append2 = vDynamicForm.appendChild;
        append2(create("<INPUT type='hidden' name='FetchXml'>"));
        append2(create("<INPUT type='hidden' name='LayoutXml'>"));
        append2(create("<INPUT type='hidden' name='EntityName'>"));
        append2(create("<INPUT type='hidden' name='DefaultAdvFindViewId'>"));
        append2(create("<INPUT type='hidden' name='ViewType'>"));
        append1(vDynamicForm);

        vDynamicForm.action = prependOrgName("/AdvancedFind/fetchData.aspx");
        vDynamicForm.FetchXml.value = Instance.FetchXml;
        vDynamicForm.LayoutXml.value = Instance.LayoutXml;
        vDynamicForm.EntityName.value = Instance.Entity;
        vDynamicForm.DefaultAdvFindViewId.value = Instance.QueryId;
        vDynamicForm.ViewType.value = 1039;
        vDynamicForm.submit();


        Instance.Iframe.attachEvent("onreadystatechange", OnViewReady);
    }

    function OnViewReady() {
        if (Instance.Iframe.readyState != 'complete') return;

        Instance.Iframe.style.border = 0;
        Instance.Iframe.detachEvent("onreadystatechange", OnViewReady);
        m_iframeDoc = getIframeDocument();
        m_iframeDoc.body.scroll = "no";
        m_iframeDoc.body.style.padding = "0px";
    }

    function getIframeDocument() {
        return Instance.Iframe.contentWindow.document;
    }

}


Note: This script is completely unsupported. it may break in the future with roll-up updates. 

Monday, December 19, 2011

Adding New Group to Subgrid in CRM 2011

Hi All, Now i am going to add new custom group to subgrid. Here I am going to add a custom group to contact entity subgrid.


1. Export the solution and open the customization.xml file using visual studio to edit.
2. Now edit the customization file, change the <RibbonDiffXml> of contact entity like this

  <RibbonDiffXml>
        <CustomActions>
          <CustomAction Id="sample.SubGrid.contact.MainTab.CustomGroup.CustomAction" Location="Mscrm.SubGrid.contact.MainTab.Groups._children" Sequence="110">
            <CommandUIDefinition>
              <Group Id="sample.SubGrid.contact.MainTab.CustomGroup.SampleGroup" Command="sample.SubGrid.contact.MainTab.CustomGroup.Command" Title="$LocLabels:CustomGroup.Title" Sequence="32" Template="Mscrm.Templates.Flexible2" Image32by32Popup="$webresource:new_samplebutton32x32.png">
                <Controls Id="sample.SubGrid.contact.MainTab.CustomGroup.Controls">
                  <Button Id="sample.SubGrid.contact.MainTab.CustomGroup.CustomButton.A" Command="sample.SubGrid.contact.MainTab.CustomGroup.CustomButton.A.Command" Sequence="21" LabelText="$LocLabels:CustomButton.A.LableText" ToolTipTitle="$LocLabels:CustomButton.A.LableText" ToolTipDescription="$LocLabels:CustomButton.A.ToolTipDescription" Image16by16="$webresource:new_samplebutton16x16.png" Image32by32="$webresource:new_samplebutton32x32.png" TemplateAlias="o1" />
                </Controls>
              </Group>
            </CommandUIDefinition>
          </CustomAction>
          <CustomAction Id="sample.SubGrid.contact.MainTab.CustomGroup.Maxsize.CustomAction" Location="Mscrm.SubGrid.contact.MainTab.Scaling._children" Sequence="120">
            <CommandUIDefinition>
              <MaxSize Id="sample.SubGrid.contact.MainTab.CustomGroup.Maxsize" GroupId="sample.SubGrid.contact.MainTab.CustomGroup.SampleGroup" Sequence="21" Size="LargeMedium" />
            </CommandUIDefinition>
          </CustomAction>
        </CustomActions>
        <Templates>
          <RibbonTemplates Id="Mscrm.Templates"></RibbonTemplates>
        </Templates>
        <CommandDefinitions>
          <CommandDefinition Id="sample.SubGrid.contact.MainTab.CustomGroup.Command">
            <EnableRules>
              <EnableRule Id="sample.SubGrid.contact.CustomGroup.EnableRule" />
            </EnableRules>
            <DisplayRules>
            </DisplayRules>
            <Actions />
          </CommandDefinition>
          <CommandDefinition Id="sample.SubGrid.contact.MainTab.CustomGroup.CustomButton.A.Command">
            <EnableRules>
              <EnableRule Id="sample.SubGrid.contact.SingleRecordSelection.EnableRule" />
            </EnableRules>
            <DisplayRules />
            <Actions>
              <!-- This new_sample.js webresource must be added before customizing -->
              <JavaScriptFunction FunctionName="TestFunction" Library="$webresource:new_sample.js">
                <CrmParameter Value="SelectedControlSelectedItemIds" />
              </JavaScriptFunction>
            </Actions>
          </CommandDefinition>
        </CommandDefinitions>
        <RuleDefinitions>
          <TabDisplayRules />
          <DisplayRules />
          <EnableRules>
            <EnableRule Id="sample.SubGrid.contact.CustomGroup.EnableRule">
              <EntityRule AppliesTo="PrimaryEntity" EntityName="account" />
            </EnableRule>
            <EnableRule Id="sample.SubGrid.contact.SingleRecordSelection.EnableRule">
              <SelectionCountRule AppliesTo="SelectedEntity" Minimum="1" Maximum="1" />
            </EnableRule>
          </EnableRules>
        </RuleDefinitions>
        <LocLabels>
          <LocLabel Id="CustomButton.A.LableText">
            <Titles>
              <Title languagecode="1033" description="Sample Button" />
            </Titles>
          </LocLabel>
          <LocLabel Id="CustomButton.A.ToolTipDescription">
            <Titles>
              <Title languagecode="1033" description="Sample Button Description" />
            </Titles>
          </LocLabel>
          <LocLabel Id="CustomGroup.Title">
            <Titles>
              <Title languagecode="1033" description="Custom Group" />
            </Titles>
          </LocLabel>
        </LocLabels>
      </RibbonDiffXml>


3. java script function on custom button click


function TestFunction(selectedRecordID) {  
   alert(selectedRecordID[0]);  
   // your logic 
}


4. Save the customization.xml file and export back to CRM.

        Now you will find the custom group and button on the contact subgrid. Here custom button will be enable when you are accessing contact entity subgrid from only Account entity. For rest of all the entities this custom button will be in disable mode. Only single record selection from subgrid will be allowed.

keep coding!!!!!

Tuesday, December 13, 2011

Retrieve OptionSet Text in CRM 2011 using C#

Hi All, In CRM 2011 we have two types of Option Sets. one will be normal Option set Filed and the other one will be Global Option Set. Lets see how to retrieve Option Set Text for both types.

Retrieve Normal(Local) Option Set Text


// Get Normal option set Text
string optionsetText = entity.FormattedValues["new_optionset"];

or

string optionsetText = entity.GetFormattedAttributeValue("new_optionset");

Retrieve Global Option Set Text

int OptionsetValue = ((Microsoft.Xrm.Sdk.OptionSetValue)entity["new_localoptionset"]).Value;
string GlobaloptionsetText= GetOptionsetText(entity, service, "new_globaloptionset", OptionsetValue );


  // Retrieves Global Option set Selected Text
        // Parameters: 1. Entity Name   2. Service  3. Global Option Set Name   4. optionset selected value
        public string GetOptionsetText(Entity entity, IOrganizationService service,string  optionsetName,int optionsetValue)
        {
            string optionsetSelectedText = string.Empty;
            try
            {


                RetrieveOptionSetRequest retrieveOptionSetRequest =
                    new RetrieveOptionSetRequest
                    {
                        Name = optionsetName
                    };

                // Execute the request.
                RetrieveOptionSetResponse retrieveOptionSetResponse =
                    (RetrieveOptionSetResponse)service.Execute(retrieveOptionSetRequest);

                // Access the retrieved OptionSetMetadata.
                OptionSetMetadata retrievedOptionSetMetadata = (OptionSetMetadata)retrieveOptionSetResponse.OptionSetMetadata;

                // Get the current options list for the retrieved attribute.
                OptionMetadata[] optionList = retrievedOptionSetMetadata.Options.ToArray();
                foreach (OptionMetadata optionMetadata in optionList)
                {
                    if (optionMetadata.Value == optionsetValue)
                    {
                        optionsetSelectedText = optionMetadata.Label.UserLocalizedLabel.Label.ToString();
break;
                    }
                }
            }
            catch (Exception)
            {


                throw;
            }
            return optionsetSelectedText;
        }

===========================================


// Gets Local/Normal optionset Lable using Metadata Service
         public static string GetoptionsetText(string entityName, string attributeName, int optionSetValue, IOrganizationService service)
         {
             string AttributeName = attributeName;
             string EntityLogicalName = entityName;
             RetrieveEntityRequest retrieveDetails = new RetrieveEntityRequest
             {
                 EntityFilters = EntityFilters.All,
                 LogicalName = EntityLogicalName
             };
             RetrieveEntityResponse retrieveEntityResponseObj = (RetrieveEntityResponse)service.Execute(retrieveDetails);
             Microsoft.Xrm.Sdk.Metadata.EntityMetadata metadata = retrieveEntityResponseObj.EntityMetadata;
             Microsoft.Xrm.Sdk.Metadata.PicklistAttributeMetadata picklistMetadata = metadata.Attributes.FirstOrDefault(attribute => String.Equals

(attribute.LogicalName, attributeName, StringComparison.OrdinalIgnoreCase)) as Microsoft.Xrm.Sdk.Metadata.PicklistAttributeMetadata;
             Microsoft.Xrm.Sdk.Metadata.OptionSetMetadata options = picklistMetadata.OptionSet;
             IList<OptionMetadata> OptionsList = (from o in options.Options
                                                     where o.Value.Value == optionSetValue
                                                     select o).ToList();
             string optionsetLabel = (OptionsList.First()).Label.UserLocalizedLabel.Label;
             return optionsetLabel;
         }


happy coding :) 

Wednesday, November 30, 2011

Phone Number Validation using java script in CRM 2011

Hi All, Here is the logic to format Phone Number field into '(xxx) xxx-xxxx' format. It only allows user to enter only numeric characters, up to 10 char's.

function Bindevents() {
   // Binding the events to crm field, which needs to be validated
    crmForm.all.telephone1.onkeypress = isvalidPhone;
    crmForm.all.telephone1.onblur = function () { formatPhoneNumber("telephone1"); };
}


// Allows to enter only Numbers & upto 10 char's
function isvalidPhone() {
 
    var charCode = event.keyCode;
    if (charCode > 31 && (charCode < 48 || charCode > 57))
        return false;


    var phnum = event.srcElement.value.replace(/[^0-9]/g, "");
    if (phnum.length >= 10)
         return false;


    return true;
}


// Formats Phone Number to '(xxx) xxx-xxxx' format
function formatPhoneNumber(phnum) {
 
    var phone = Xrm.Page.getAttribute(phnum).getValue();
    var tmp = phone.replace(/[^0-9]/g, "");
    phoneRegex = /^\d{10}$/;


    if (!tmp.match(phoneRegex)) {
            event.returnValue = false;        
            Xrm.Page.data.entity.attributes.get(phnum).controls.get(0).setFocus();
         
        }
        else {
            var formtedphn = "(" + tmp.substr(0, 3) + ") " + tmp.substr(3, 3) + "-" + tmp.substr(6, 4);
            Xrm.Page.getAttribute(phnum).setValue(formtedphn);
        }  
}

Hope it helps!!!!

Monday, November 28, 2011

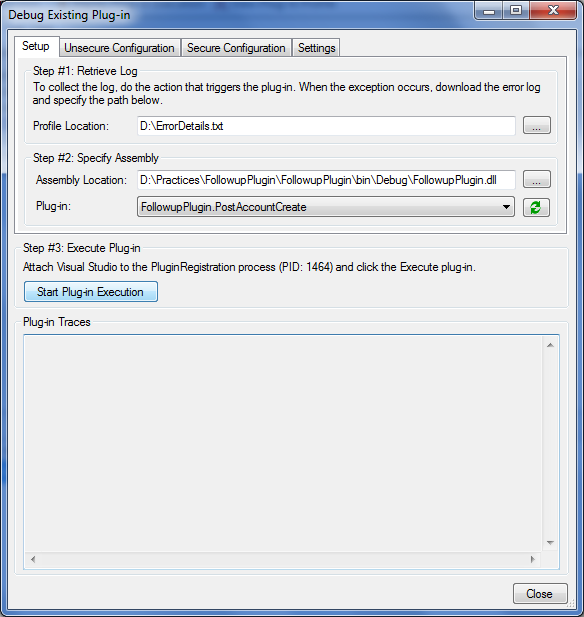
How to Debug CRM 2011 online plugin

Hi All, its difficult to debug plugins registered in sandbox on CRM 2011 online version. Follow the Steps to debug plugins registered for online version
  • Install Plugin Pro-filer in the plugin registration Tool.(if you don’t find this option, download latest SDK)
  • Now Register the plug-in and step on the Microsoft Dynamics CRM server. Keep a copy of the debug compiled plug-in assembly on the computer where you are running the tool(@SDK\sdk\tools\pluginregistration\bin\Debug)
  • Select a plug-in step and click Profile to enable profiling.
  •  Perform the operation in Microsoft Dynamics CRM that causes the plug-in to run. Ex: Here updation of Account which trigger the plugin.
  • Now the plug-in throws an exception and the Business Process Error dialog is displayed, click Download Log File and save this file.
  • In the Plug-in Registration tool, click Debug.

  • Debug Dialog will open

            select the Saved Error Log File in the “Profile Location” and then select the Plugin assembly location in the “Assembly Location” where .rdb file available to debug. select the plugin which needs to be debug in the “Plug-in” dropdown list.

    • Now open the plugin solution in Visual Studio and then place the break point to debug, attach the debugger to PluginRegistration.exe process.
    • Click Start Plug-in Execution in the Debug Existing Plug-in dialog box
    • Now the debugger will start debugging from the break point in  the VS. Now you can debug the plugin in the normal way like on-premise.
    • For more info on plugin debugging  click . I hope it helps!!!!!!

    Wednesday, November 23, 2011

    Adding New Group to CRM Form in CRM 2011

    Hi Friends, Now I will walk through how to add a new group to an OOB entity.


    Before Adding Custom Group to Account Entity

    After Adding Custom Group to Account Enity

    Follow the following steps
    1. Export the solution to which we wants to customize
    2. Open the Customizations.xml file in edit mode
    3. Find "RibbonDiffXml" tag under Account entity
    4. customize the "RibbonDiffXml" in the following way to add custom group to Entity Form

     <RibbonDiffXml>
            <CustomActions>
            <CustomAction Id="Sample.account.form.CustomGroup.CustomAction" Location="Mscrm.Form.account.MainTab.Groups._children" Sequence="110">
              <CommandUIDefinition>
                <Group Id="sample.account.form.CustomGroup.Group" Command="sample.account.form.CustomGroup.Command" Title="$LocLabels:sample.account.CustomGroup.Title" Sequence="38" Template="Mscrm.Templates.Flexible2" Image32by32Popup="$webresource:new_samplebutton32x32.png">
                  <Controls Id="sample.account.form.CustomGroup.Controls">
                    <Button Id="sample.account.form.CustomGroup.Button.A" Command="sample.account.CustomGroup.Button.A.Command" Sequence="20" LabelText="$LocLabels:sample.account.CustomGroup.Button.A.LabelText" ToolTipTitle="$LocLabels:sample.account.CustomGroup.Button.A.LabelText" ToolTipDescription="$LocLabels:sample.account.CustomGroup.Button.A.Description" TemplateAlias="o1" Image16by16="$webresource:new_samplebutton16x16.png" Image32by32="$webresource:new_samplebutton32x32.png" />              
                  </Controls>
                </Group>
              </CommandUIDefinition>
            </CustomAction>
              <CustomAction Id="sample.account.form.CustomGroup.MaxSize.CustomAction" Location="Mscrm.Form.account.MainTab.Scaling._children" Sequence="120">
                <CommandUIDefinition>
                  <MaxSize Id="sample.account.form.CustomGroup.MaxSize" GroupId="sample.account.form.CustomGroup.Group" Sequence="21" Size="LargeLarge" />
                </CommandUIDefinition>
              </CustomAction>      
            </CustomActions>
            <Templates>
              <RibbonTemplates Id="Mscrm.Templates"></RibbonTemplates>
            </Templates>
            <CommandDefinitions>
              <CommandDefinition Id="sample.account.CustomGroup.Button.A.Command">
                <EnableRules/>
                <DisplayRules>
                  <DisplayRule Id="sample.account.form.DisplayRule.NotonCreate" />
                </DisplayRules>
                <Actions>
                  <JavaScriptFunction Library="$webresource:new_sample.js" FunctionName="TestFunction"></JavaScriptFunction>
                </Actions>
              </CommandDefinition>
              <CommandDefinition Id="sample.account.form.CustomGroup.Command">
                <EnableRules/>
                <DisplayRules>
                  <DisplayRule Id="sample.account.form.DisplayRule.NotonCreate" />
                </DisplayRules>
                <Actions />
              </CommandDefinition>
            </CommandDefinitions>
            <RuleDefinitions>
              <TabDisplayRules />
              <DisplayRules>
                <DisplayRule Id="sample.account.form.DisplayRule.NotonCreate">          
                  <FormStateRule State="Create" InvertResult="true" />
                </DisplayRule>
              </DisplayRules>
              <EnableRules />
            </RuleDefinitions>
            <LocLabels>
              <LocLabel Id="sample.account.CustomGroup.Button.A.Description">
                <Titles>
                  <Title languagecode="1033" description="Custom Button Description" />
                </Titles>
              </LocLabel>
              <LocLabel Id="sample.account.CustomGroup.Button.A.LabelText">
                <Titles>
                  <Title languagecode="1033" description="Custom Button" />
                </Titles>
              </LocLabel>        
              <LocLabel Id="sample.account.CustomGroup.Title">
                <Titles>
                  <Title languagecode="1033" description="Custom Group" />
                </Titles>
              </LocLabel>
            </LocLabels>
          </RibbonDiffXml>


    5. Now zip the solution and import back to CRM. you will find the custom Group on the Account Form.


    Hope it helps!!!

    Tuesday, September 20, 2011

    Update Optionset, lookup data using OData service, JSON

    Here I am going to update Optionset and Lookup fields using Odata Service in CRM 2011. In the SDK sample you will find only to update Text fields. After spending some time on Odata service, i got the solution to update Option set and Lookup fields.

            Here i am going to update Account information using Odata service.

    function updateOptionset() {
        // Gets the record Guid
        var id = Xrm.Page.data.entity.getId();    
        var changes = {
          // Text field
            Telephone1: "123456789",
         // Option set field    
           Address1_AddressTypeCode: {  Value: 3 },
          // Lookup field
           ParentAccountId: {         
               Id: "8F8338A9-9AB2-E011-9E6D-000C29B0167C", // Guid of the parent account
               LogicalName: "account"
           }
        };
      
        //updateRecord exists in JQueryRESTDataOperationFunctions.js
        updateRecord(id, changes, "AccountSet", updateAccountCompleted, null);
    }

    function updateRecord(id, entityObject, odataSetName, successCallback, errorCallback) {
        var context = Xrm.Page.context;
        var serverUrl = context.getServerUrl();

        //The XRM OData end-point
        var ODATA_ENDPOINT = "/XRMServices/2011/OrganizationData.svc";

        //id is required
        if (!id) {
            alert("record id is required.");
            return;
        }
        //odataSetName is required, i.e. "AccountSet"
        if (!odataSetName) {
            alert("odataSetName is required.");
            return;
        }

        //Parse the entity object into JSON
        var jsonEntity = window.JSON.stringify(entityObject);

        //Asynchronous AJAX function to Update a CRM record using OData
        $.ajax({
            type: "POST",
            contentType: "application/json; charset=utf-8",
            datatype: "json",
            data: jsonEntity,
            url: serverUrl + ODATA_ENDPOINT + "/" + odataSetName + "(guid'" + id + "')",
            beforeSend: function (XMLHttpRequest) {
                //Specifying this header ensures that the results will be returned as JSON.             
                XMLHttpRequest.setRequestHeader("Accept", "application/json");

                //Specify the HTTP method MERGE to update just the changes you are submitting.             
                XMLHttpRequest.setRequestHeader("X-HTTP-Method", "MERGE");
            },
            success: function (data, textStatus, XmlHttpRequest) {
                //The MERGE does not return any data at all, so we'll add the id 
                //onto the data object so it can be leveraged in a Callback. When data 
                //is used in the callback function, the field will be named generically, "id"
                data = new Object();
                data.id = id;
                if (successCallback) {
                    successCallback(data, textStatus, XmlHttpRequest);
                }
            },
            error: function (XmlHttpRequest, textStatus, errorThrown) {
                if (errorCallback)
                    errorCallback(XmlHttpRequest, textStatus, errorThrown);
                else
                    errorHandler(XmlHttpRequest, textStatus, errorThrown);
            }
        });
    }


    function errorHandler(xmlHttpRequest, textStatus, errorThrow) {  
        alert("Error : " + textStatus + ": " + xmlHttpRequest.statusText);
    }

    //Called upon successful Account update.
    function updateAccountCompleted(data, textStatus, XmlHttpRequest) {   
        //Get back the Account JSON object
        var account = data;
        alert("Account updated: id = " + account.id);
    }

    Hope it helps!!!!

    Adding New Group to Ribbon in CRM 2011

    we have seen adding a button and renaming buttons in my previous posts. Now i am going to add a new group to the Ribbon.
    Default Account Ribbon at Form Level.
    After Adding New Group to Account Ribbon

    1. Export the Solution to customize. And open the Customization.XML file for editing.(solution must contain sitemap)
    2. Open Account RibbonDiffXml ribbon definition and then edit with the following logic
    source code for the sample

     <RibbonDiffXml>
            <CustomActions>
              <CustomAction Id="Sample.account.form.CustomGroup.CustomAction" Location="Mscrm.Form.account.MainTab.Groups._children" Sequence="61">
                <CommandUIDefinition>
                  <Group Id="Sample.account.form.CustomGroup.Group" Command="Sample.account.form.CustomGroup.Command" Title="Custom Group" Sequence="11" Template="Mscrm.Templates.Flexible2" Image32by32Popup="/_imgs/Workplace/remove_32.png">
                    <Controls Id="Sample.account.form.CustomGroup.Controls">
                      <Button Id="Sample.account.form.CustomGroup.CustomButton1" Command="Sample.account.form.CustomGroup.CustomButton1.Command" Sequence="10" LabelText="Custom Button1" ToolTipTitle="Custom Button ToolTip" ToolTipDescription="Custom Button1 Tooltip Description " TemplateAlias="o1" Image16by16="/_imgs/ribbon/ActivityClose_16.png" Image32by32="/_imgs/ribbon/ActivtiyClose_32.png" />
                      <Button Id="Sample.account.form.CustomGroup.CustomButton2" Command="Sample.account.form.CustomGroup.CustomButton2.Command" Sequence="20" LabelText="Custom Button2" ToolTipTitle="Custom Button ToolTip" ToolTipDescription="Custom Button2 Tooltip Description " TemplateAlias="o1" Image16by16="/_imgs/ribbon/delete16.png" Image32by32="/_imgs/Workplace/remove_32.png" />
                    </Controls>
                  </Group>
                </CommandUIDefinition>
              </CustomAction>
              <CustomAction Id="Sample.account.form.CustomGroup.MaxSize.CustomAction" Location="Mscrm.Form.account.MainTab.Scaling._children" Sequence="71">
                <CommandUIDefinition>
                  <MaxSize Id="Sample.account.form.CustomGroup.MaxSize" GroupId="Sample.account.form.CustomGroup.Group" Sequence="11" Size="LargeLarge" />
                </CommandUIDefinition>
              </CustomAction>
            </CustomActions>
            <Templates>
              <RibbonTemplates Id="Mscrm.Templates"></RibbonTemplates>
            </Templates>
            <CommandDefinitions>
              <CommandDefinition Id="Sample.account.form.CustomGroup.CustomButton2.Command">
                <EnableRules>
                  <EnableRule Id="Mscrm.Enabled" />
                </EnableRules>
                <DisplayRules />
                <Actions>
                  <JavaScriptFunction Library="$Webresource:new_accountmainlib" FunctionName="MyFunction" />
                  
                </Actions>
              </CommandDefinition>
              <CommandDefinition Id="Sample.account.form.CustomGroup.Command">
                <EnableRules>
                  <EnableRule Id="Mscrm.Enabled" />
                </EnableRules>
                <DisplayRules />
                <Actions />
              </CommandDefinition>
              <CommandDefinition Id="Sample.account.form.CustomGroup.CustomButton1.Command">
                <EnableRules>
                  <EnableRule Id="Mscrm.Enabled" />
                </EnableRules>
                <DisplayRules />
                <Actions>
                  <Url Address="http://google.com" />
                </Actions>
              </CommandDefinition>
            </CommandDefinitions>
            <RuleDefinitions>
              <TabDisplayRules />
              <DisplayRules />
              <EnableRules />
            </RuleDefinitions>
            <LocLabels />
          </RibbonDiffXml>

    3. Now import the solution and check the changes.

    Hope it helps!!!!!

    Thursday, August 4, 2011

    Changing OOB Ribbon Button Label in CRM 2011

    Hi All, Here I am going to change the OOB Ribbon Button label. Now I am going to Change OOB "DeActive" Button Lable to "InActive" on the Account Form.

    Account Form Ribbon Before Changing Label for "Deactive" Button

    Account Form Ribbon After Changing  "Deactive" Button Label to "InActive"

    1. Open “accounribbon.xml” file from the “\sdk\samplecode\cs\client\ribbon\exportribbonxml\exportedribbonxml” location in the CRM 2011 SDK.

    2. Find the "Deactive" Ribbon Button definition
     <Group Id="Mscrm.Form.account.MainTab.Save" Command="Mscrm.Enabled" Sequence="10" Title="$Resources:Ribbon.Form.MainTab.Save" Image32by32Popup="/_imgs/ribbon/Save_32.png" Template="Mscrm.Templates.Flexible2">
                    <Controls Id="Mscrm.Form.account.MainTab.Save.Controls">
                      <Button Id="Mscrm.Form.account.SaveAsComplete" ToolTipTitle="$Resources:Ribbon.Form.MainTab.Save.SaveAsComplete" ToolTipDescription="$Resources(EntityDisplayName):Ribbon.Tooltip.SaveAsComplete" Command="Mscrm.SavePrimaryActivityAsComplete" Sequence="10" LabelText="$Resources:Ribbon.Form.MainTab.Save.SaveAsComplete" Alt="$Resources:Ribbon.Form.MainTab.Save.SaveAsComplete" Image16by16="/_imgs/ribbon/SaveAsCompleted_16.png" Image32by32="/_imgs/ribbon/SaveAsCompleted_32.png" TemplateAlias="o1" />
                      <Button Id="Mscrm.Form.account.Save" ToolTipTitle="$Resources:Mscrm_Form_Other_MainTab_Save_Save_ToolTipTitle" ToolTipDescription="$Resources(EntityDisplayName):Ribbon.Tooltip.Save" Command="Mscrm.SavePrimary" Sequence="20" LabelText="$Resources:Ribbon.Form.MainTab.Save.Save" Alt="$Resources:Ribbon.Form.MainTab.Save.Save" Image16by16="/_imgs/ribbon/Save_16.png" Image32by32="/_imgs/ribbon/Save_32.png" TemplateAlias="o1" />
                      <Button Id="Mscrm.Form.account.SaveAndClose" ToolTipTitle="$Resources:Mscrm_Form_Other_MainTab_Save_SaveAndClose_ToolTipTitle" ToolTipDescription="$Resources(EntityDisplayName):Ribbon.Tooltip.SaveAndClose" Command="Mscrm.SaveAndClosePrimary" Sequence="30" LabelText="$Resources:Ribbon.Form.MainTab.Save.SaveAndClose" Alt="$Resources:Ribbon.Form.MainTab.Save.SaveAndClose" Image16by16="/_imgs/FormEditorRibbon/SaveAndClose_16.png" Image32by32="/_imgs/ribbon/SaveAndClose_32.png" TemplateAlias="o1" />
                      <Button Id="Mscrm.Form.account.SaveAndNew" ToolTipTitle="$Resources:Mscrm_Form_Other_MainTab_Save_SaveAndNew_ToolTipTitle" ToolTipDescription="$Resources(EntityDisplayName):Ribbon.Tooltip.SaveAndNew" Command="Mscrm.SaveAndNewPrimary" Sequence="40" LabelText="$Resources:Ribbon.Form.MainTab.Save.SaveAndNew" Alt="$Resources:Ribbon.Form.MainTab.Save.SaveAndNew" Image16by16="/_imgs/ribbon/saveandnew16.png" Image32by32="/_imgs/ribbon/saveandnew32.png" TemplateAlias="o2" />
                      <Button Id="Mscrm.Form.account.Activate" ToolTipTitle="$Resources:Ribbon.HomepageGrid.account.Record.Status.Activate" ToolTipDescription="$Resources(EntityPluralDisplayName):Ribbon.Tooltip.Activate" Command="Mscrm.Form.Activate" Sequence="50" Alt="$Resources:Ribbon.HomepageGrid.account.Record.Status.Activate" LabelText="$Resources:Ribbon.HomepageGrid.account.Record.Status.Activate" Image16by16="/_imgs/ribbon/Activate_16.png" Image32by32="/_imgs/ribbon/Activate_32.png" TemplateAlias="o2" />
                      <Button Id="Mscrm.Form.account.Deactivate" ToolTipTitle="$Resources:Ribbon.HomepageGrid.account.Record.Status.Deactivate" ToolTipDescription="$Resources(EntityPluralDisplayName):Ribbon.Tooltip.Deactivate" Command="Mscrm.Form.Deactivate" Sequence="60" Alt="$Resources:Ribbon.HomepageGrid.account.Record.Status.Deactivate" LabelText="$Resources:Ribbon.HomepageGrid.account.Record.Status.Deactivate" Image16by16="/_imgs/ribbon/deactivate16.png" Image32by32="/_imgs/ribbon/Deactivate_32.png" TemplateAlias="o2" />
                      <Button Id="Mscrm.Form.account.Delete" ToolTipTitle="$Resources:Mscrm_Form_Other_MainTab_Management_Delete_ToolTipTitle" ToolTipDescription="$Resources(EntityPluralDisplayName):Ribbon.Tooltip.Delete" Command="Mscrm.DeletePrimaryRecord" Sequence="70" LabelText="$Resources:Ribbon.HomepageGrid.MainTab.Management.Delete" Alt="$Resources:Ribbon.HomepageGrid.MainTab.Management.Delete" Image16by16="/_imgs/ribbon/delete16.png" Image32by32="/_imgs/Workplace/remove_32.png" TemplateAlias="o2" />
                    </Controls>
                  </Group>

    3. Now Export the current solution and then extract the zip file, open "Customizations.xml" file in edit mode.

    4.  Find the  <RibbonDiffXml> at Account Entity level and then edit the <customActions> section to rename the 'DeActive" label.

     <CustomActions>
              <CustomAction Id="Sample.Form.account.Deactivate.CustomAction" Location="Mscrm.Form.account.Deactivate" Sequence="61">
                <CommandUIDefinition>
                  <Button Id="Mscrm.Form.account.Deactivate" ToolTipTitle="$Resources:Ribbon.HomepageGrid.account.Record.Status.Deactivate" ToolTipDescription="$Resources(EntityPluralDisplayName):Ribbon.Tooltip.Deactivate" Command="Mscrm.Form.Deactivate"  Alt="$Resources:Ribbon.HomepageGrid.account.Record.Status.Deactivate" LabelText="InActive" Image16by16="/_imgs/ribbon/deactivate16.png" Image32by32="/_imgs/ribbon/Deactivate_32.png" TemplateAlias="o2" />
                </CommandUIDefinition>
              </CustomAction>
            </CustomActions>

    Here we are changing the OOB "DeActive" Label text to "InActive" in the customActions section. But the Ribbon Button functionality will be same. If you wants to override the functionality of the button, you can change the  <CommandDefinitions> of the button.

    5. Now Import the solution back to CRM. verify the changes..

    Hope it helps!!!!


    Wednesday, August 3, 2011

    Useful Tools in CRM 2011

    some of the useful tool which are available in Codeplex.

    Ribbon Editor Tool : To customize Ribbon easily http://ribboneditor.codeplex.com/

    Site Map Editor Tool: For easy sitemap editing http://sitemapeditor.codeplex.com/

    JavaScript Resource Manager: http://jswebresourcemanager.codeplex.com/

    Odata Designer Tool : http://crm2011odatatool.codeplex.com/

    CRM 4 - CRM 2011 javascript converter: http://crm2011scriptconvert.codeplex.com/

    MetaData Browser : http://crm2011metabrowser.codeplex.com/

    Tuesday, July 19, 2011

    SharedVariables in CRM 2011 plugins

    Hi All, There is a slight change in Shared Variables in CRM 2011.          

                    // Passing Data to shared Variable
                context.SharedVariables.Add("PrimaryContact", (Object)contact.ToString());


                // Retrieving data from context shared variables.
                    Guid contact = new Guid((string)context.SharedVariables["PrimaryContact"]);

    Retrieve Attribute Data using MetaData Service in CRM 2011

    Hi All, Here I am going to retrieve an Attribute Data using MetaData Service In CRM 2011

    RetrieveAttributeRequest retrieveAttributeRequest = new
                    RetrieveAttributeRequest
                    {

                        EntityLogicalName = entityName,

                        LogicalName = attributeName,

                        RetrieveAsIfPublished = true

                    };
                    // Execute the request.
                    RetrieveAttributeResponse retrieveAttributeResponse = (RetrieveAttributeResponse)service.Execute(retrieveAttributeRequest);
                 
    // Access the retrieved attribute.

                    PicklistAttributeMetadata retrievedPicklistAttributeMetadata = (PicklistAttributeMetadata)retrieveAttributeResponse.AttributeMetadata;

                    OptionMetadata[] optionList = retrievedPicklistAttributeMetadata.OptionSet.Options.ToArray();
               
                    foreach (OptionMetadata option in optionList)
                    {
                        if (option.Value == selectedValue)
                        {
                            selectedOptionLabel = option.Label.UserLocalizedLabel.Label;
                            break;

                        }
                    }

    Wednesday, July 13, 2011

    Sharing and Unsharing Records in CRM 2011

    Hi All, Here I am going to share Account record with a user and then unsharing the account from the user in CRM 2011. Here is the logic to share and unshare records

    sharing

     // Create the request object and set the target and principal access
    GrantAccessRequest grantRequest = new GrantAccessRequest()
                {
                    Target = new EntityReference(Account.EntityLogicalName, accountId),
                    PrincipalAccess = new PrincipalAccess()
                    {
                        Principal = new EntityReference(SystemUser.EntityLogicalName, userId),
                        AccessMask = actionRights
                    }
                };

     // Execute the request.
    GrantAccessResponse granted = (GrantAccessResponse)service.Execute(grantRequest);


    Unsharing


     // Create the request object and set the target and revokee.
                RevokeAccessRequest revokeRequest = new RevokeAccessRequest()
                {
                    Target = new EntityReference(Account.EntityLogicalName, accountId),
                    Revokee = new EntityReference(SystemUser.EntityLogicalName, accountuserId)
                };

    // Execute the request.
     RevokeAccessResponse revoked = (RevokeAccessResponse)service.Execute(revokeRequest);

    Tuesday, July 12, 2011

    Maximizing CRM Form using javascript in CRM 2011

    Hi All, Maximizing CRM Form script has been changed slightly in CRM 2011. use the following code to maximize CRM Forms using javascript

    window.top.moveTo(0,0);
    window.top.resizeTo(screen.width, screen.height);

    Monday, July 11, 2011

    Retrieving optionset Lable data using Metadata service in CRM 2011

    Hi All, Using OData service we are not able to get the option set selected text of an entity. Its providing only value field, but not the text. so I have used Metadata service to retrieve Option set text for the selected value.
     Here I am retrieving State option set text from country entity and assigning that option text to text field.

    function RetrieveOptionsetLabel()
    {
         // Entity schema name 
         var entityLogicalName = "new_country";
         // option set schema name
         var RetrieveAttributeName = "new_state";
         // Target Field schema name to which optionset text needs to be assigned
         var AssignAttributeName = "new_state";

    // Option set value for which label needs to be retrieved
            var stateValue = optionValue;
         
            // Calling Metadata service to get Optionset Label
            SDK.MetaData.RetrieveEntityAsync(SDK.MetaData.EntityFilters.Attributes, entityLogicalName, null, false, function (entityMetadata) { successRetrieveEntity(entityLogicalName, entityMetadata, RetrieveAttributeName, stateValue, AssignAttributeName); }, errorDisplay);

    }

    // Called upon successful metadata retrieval of the entity
    function successRetrieveEntity(logicalName, entityMetadata, RetrieveAttributeName, OptionValue, AssignAttributeName) {
        ///<summary>
        /// Retrieves attributes for the entity 
        ///</summary>

        var success = false;
        for (var i = 0; i < entityMetadata.Attributes.length; i++) {
            var AttributeMetadata = entityMetadata.Attributes[i];
            if (success) break;
            if (AttributeMetadata.SchemaName.toLowerCase() == RetrieveAttributeName.toLowerCase()) {
                for (var o = 0; o < AttributeMetadata.OptionSet.Options.length; o++) {
                    var option = AttributeMetadata.OptionSet.Options[o];
                    if (option.OptionMetadata.Value == OptionValue) {
                        Xrm.Page.getAttribute(AssignAttributeName).setValue(option.OptionMetadata.Label.UserLocalizedLabel.Label);
                        success = true;
                        break;
                    }
                }
            }

        }


    }


     function errorDisplay(XmlHttpRequest, textStatus, errorThrown) {

         alert(errorThrown);
     }

    Note: Dont forget to add "sdk.metadata.js" resource to form before calling these methods. you can find this library in sdk "sdk\samplecode\js\soapforjscript\soapforjscript\scripts".


    Saturday, July 9, 2011

    Custom Lookup Filter Lookup in CRM 2011 using javascript

    Hi All, Some times we will get requirement to set filterlookup using java script. CRM 2011 provides OOB Filter Lookups, but it has some limitations. For Activities they did not provided filter lookup facility. Recently i came accross Letter activity to set filter lookup. Here is the way to set filter lookup  using java script.

    Here I am going to set contact lookup with selected account as parent.


    function customfilterlookup(AccoundID)
    {
    //Show Contacts which has selected parent Account
        //build fetchxml, use Advance Find to get Fetchxml
        var viewId = "{a76b2c46-c28e-4e5e-9ddf-951b71202c9d}"; //view Guid
        var entityName = "contact"; // Entity to be filtered
        var viewDisplayName = "Active Contacts"; // Custom name for the lookup window.
        var fetchXml = "<fetch version='1.0' output-format='xml-platform' mapping='logical' distinct='false'>" +
                      "<entity name='contact'>" +
                        "<attribute name='fullname' />" +
                        "<attribute name='parentcustomerid' />" +                  
                        "<attribute name='emailaddress1' />" +
                        "<attribute name='address1_telephone2' />" +
                        "<attribute name='new_city' />" +
                        "<attribute name='address1_stateorprovince' />" +
                        "<attribute name='address1_telephone1' />" +
                        "<attribute name='ownerid' />" +
                        "<attribute name='contactid' />" +
                        "<order attribute='fullname' descending='false' />" +
                        "<filter type='and'>" +
                          "<condition attribute='parentcustomerid' operator='eq'  uitype='account' value='"+AccoundID+"' />" +
                          "<condition attribute='statecode' operator='eq' value='0' />" +
                        "</filter>" +
                      "</entity>" +
                    "</fetch>";
        // Build Grid Layout. building a custom view for the Lookup
        //building grid layout with the columns which needs to be displayed in the lookup view
        var layoutXml = "<grid name='resultset' " +
                        "object='1' " +
                        "jump='name' " +
                        "select='1' " +
                        "icon='1' " +
                        "preview='1'>" +
                        "<row name='result' " +
                        "id='contactid'>" + // Id/key attribute of the entity to be filtered
                        "<cell name='fullname' " +
                        "width='250' />" +
                        "<cell name='new_city' " +
                        "width='70' />" +
                        "<cell name='address1_telephone1' " +
                        "width='100' />" +
                        "</row>" +
                        "</grid>";
        // add new view to the lookup
        Xrm.Page.getControl("contact").addCustomView(viewId, entityName, viewDisplayName, fetchXml, layoutXml, true);
    }

    keep smiling.. :)